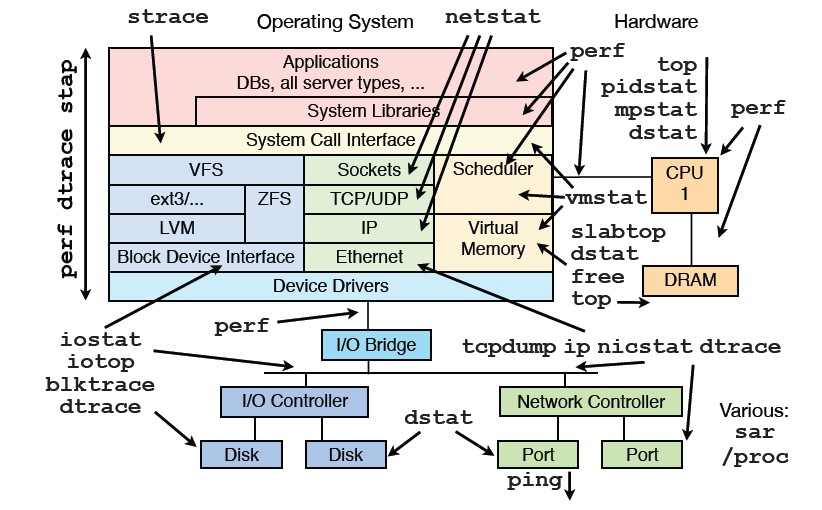
前段时间看到brendangregg的 Linux Performance Analysis and Tools PPT里面提到Linux常用性能调优工具, 见下图:

其中提到了的工具,大部分在我日常工具箱里或者在实践的案例里面使用过, 都有很高的价值,这里方便大家索引下:
- nicstat: 参见 这里
- oprofile: 参见 这里
- perf: 参见 这里
- systemtap: 参见 这里
- iotop: 参见 这里
- blktrace: 参见 这里
- dstat: 参见 这里
- strace: 参见 这里
- pidstat: 参见 这里
- vmstat: 参见 这里
- slabtop: 参见 这里
- tcpdump: 参见 这里
- free: 参见 这里
- mpstat: 参见 这里
- netstat: 参见 这里
- tcprstat: 参见 这里
更多的Linux系统工具介绍请参见 这里
祝玩得开心!
前段时间看到brendangregg的 Linux Performance Analysis and Tools PPT里面提到的nicstat,研究了下是个不错的东西,分享给大家。
nicstat is to network interfaces as “iostat” is to disks, or “prstat” is to processes.
nicstat原本是Solaris平台下显示网卡流量的工具,Tim Cook将它移植到linux平台,官方网站见 这里。 相比netstat, 他有以下关键特性:
- Reports bytes in & out as well as packets.
- Normalizes these values to per-second rates.
- Reports on all interfaces (while iterating)
- Reports Utilization (rough calculation as of now)
- Reports Saturation (also rough)
- Prefixes statistics with the current time
我们来体验下,首先安装之,源码在 这里 下, 目前最新的版本是1.92。
解开后,由于这个版本默认是在32位linux下编译,所以需要改下Makefile.Linux:
$ uname -r
2.6.32-131.21.1.tb477.el6.x86_64
$ diff Makefile.Linux64 Makefile.Linux
17c17
< CFLAGS =      $(COPT) -m32
---
> CFLAGS =      $(COPT)

$ sudo make -f Makefile.Linux install
sudo install -o root -g root -m 4511 `./nicstat.sh --bin-name` /usr/local/bin/nicstat
sudo install -o bin -g bin -m 555 enicstat /usr/local/bin
sudo install -o bin -g bin -m 444 nicstat.1 /usr/local/share/man/man1/nicstat.1
enicstat就安装好可以使用了。
使用文档在这里: man nicstat
由于在linux下需要获取网卡的speed等信息,需要以特权用户运行。
Read more…
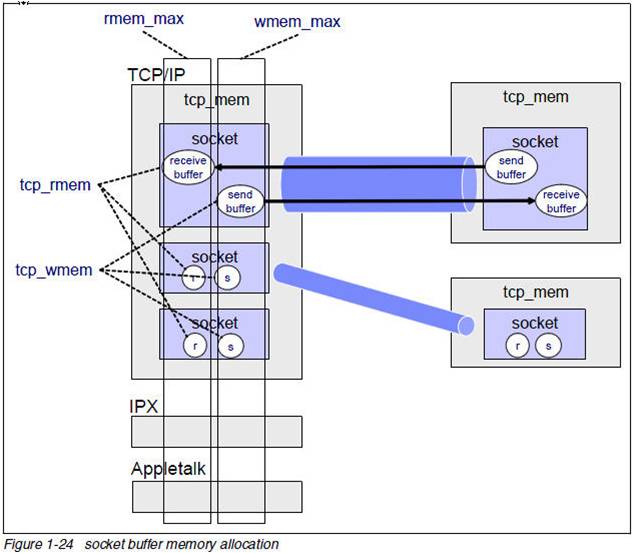
我们知道TCP socket有发送缓冲区和接收缓冲区,这二个缓冲区都可以透过setsockopt设置SO_SNDBUF,SO_RCVBUF来修改,但是这些值设多大呢?这些值和协议栈的内存控制相关的值什么关系呢?
我们来解释下:
$ sysctl net|grep mem
net.core.wmem_max = 131071
net.core.rmem_max = 131071
net.core.wmem_default = 124928
net.core.rmem_default = 124928
net.core.optmem_max = 20480
net.ipv4.igmp_max_memberships = 20
net.ipv4.tcp_mem = 4631520 6175360 9263040
net.ipv4.tcp_wmem = 4096 16384 4194304
net.ipv4.tcp_rmem = 4096 87380 4194304
net.ipv4.udp_mem = 4631520 6175360 9263040
net.ipv4.udp_rmem_min = 4096
net.ipv4.udp_wmem_min = 4096
下面的图很好的解释了上面的问题:

这里要记住的是:TCP协议栈内存是不可交换物理内存,用一字节少一字节。
也正是由于这一点,操作系统出厂的时候上面的默认的内存设置都不算太大。对于一个不是网络密集型的服务器问题不大,但是对于如承担C1M链接的服务器来讲,问题就来了。我们在实践中会发现tcp服务经常超时,有时候超过100ms. 那么这个问题如何定位呢?
Read more…
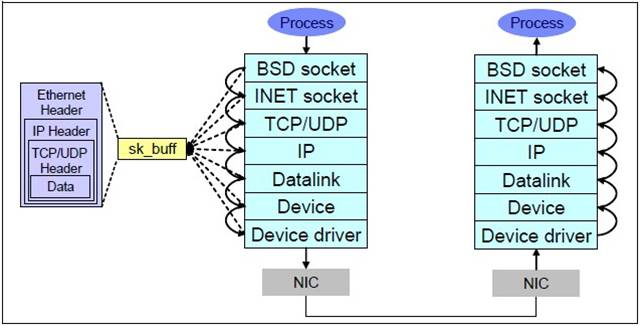
在做网络服务器的时候,会碰到各种各样的网络问题比如说网络超时,通常一般的开发人员对于这种问题最常用的工具当然是tcpdump或者更先进的wireshark来进行抓包分析。通常这个工具能解决大部分的问题,但是比如说wireshark发现丢包,那深层次的原因就很难解释了。这不怪开发人员,要怪就怪linux网络协议栈太深。我们来看下:

这7层里面每个层都可能由于各种各样的原因,比如说缓冲区满,包非法等,把包丢掉,这样的问题就需要特殊的工具来发现了。 好了,主角dropwatch出场.
它的官方网站在这里
What is Dropwatch
Dropwatch is a project I am tinkering with to improve the visibility developers and sysadmins have into the Linux networking stack. Specifically I am aiming to improve our ability to detect and understand packets that get dropped within the stack.
Dropwatch定位很清晰,就是用来查看协议栈丢包的问题。
RHEL系的系统安装相当简单,yum安装下就好:
$ uname -r
2.6.32-131.21.1.tb477.el6.x86_64
$ sudo yum install dropwatch
man dropwatch下就可以得到使用的帮助,dropwatch支持交互模式, 方便随时启动和停止观测。
使用也是很简单:
$ sudo dropwatch -l kas
Initalizing kallsymsa db
dropwatch> start
Enabling monitoring...
Kernel monitoring activated.
Issue Ctrl-C to stop monitoring
1 drops at netlink_unicast+251
15 drops at unix_stream_recvmsg+32a
3 drops at unix_stream_connect+1dc
-l kas的意思是获取drop点的符号信息,这样的话针对源码就可以分析出来丢包的地方。
同学们可以参考这篇文章(Using netstat and dropwatch to observe packet loss on Linux servers):http://prefetch.net/blog/index.php/2011/07/11/using-netstat-and-dropwatch-to-observe-packet-loss-on-linux-servers/
那他的原理是什么呢?在解释原理之前,我们先看下这个工具的对等的stap脚本:
Read more…


Recent Comments