Archive

Archive for the ‘工具介绍’ Category

IO模式调查利器blkiomon介绍

November 9th, 2011 Comments off

原创文章,转载请注明: 转载自系统技术非业余研究

本文链接地址: IO模式调查利器blkiomon介绍

blkiomon 是blktrace工具包带的一个方便用户了解IO情况的工具, 由于blktrace太专业,需要了解的IO协议栈的东西太多,blkiomon给大多数的用户提供了一种易于使用的方式.
blktrace的使用参考这里: http://blog.yufeng.info/archives/tag/blktrace
他可以告诉你IO的大小,完成花费时间,吞吐量, 还可以统计出这次关键参数的分布.
具体见man blkiomon

blkiomon is a block device I/O monitor. It periodically generates per-device request size and request latency statistics from blktrace data. It
provides histograms as well as data that can be used to calculate min, max, average and variance. For this purpose, it consumes D and C traces
read from stdin.

我们来演示下:
Read more…

Post Footer automatically generated by wp-posturl plugin for wordpress.

Categories: Linux, 工具介绍, 调优 Tags: ,

Flashcache使用的误区以及解决方案

October 28th, 2011 6 comments

原创文章,转载请注明: 转载自系统技术非业余研究

本文链接地址: Flashcache使用的误区以及解决方案

flashcache是facebook释放出来的开源的混合存储方案,用ssd来做cache提升IO设备的性能.很多硬件厂商也有类似的方案,比如说LSI raid卡. 但是这个方案是免费的软件方案,而且经过产品的考验,具体参见:
主页:https://github.com/facebook/flashcache
开源混合存储方案(Flashcache): http://blog.yufeng.info/archives/1165
Flashcache新版重大变化: http://blog.yufeng.info/archives/1429

但是flashcache在使用中很多人会有个误区,导致性能很低。首先我们看下flashcache的设计背景和适用场景:

Introduction :
============
Flashcache is a write back block cache Linux kernel module. This
document describes the design, futures ideas, configuration, tuning of
the flashcache and concludes with a note covering the testability
hooks within flashcache and the testing that we did. Flashcache was
built primarily as a block cache for InnoDB but is general purpose and
can be used by other applications as well.

它是为数据库这样的应用的离散读写优化。如果你用在了顺序读写,就有非常大的性能问题。
那么为什么呢?我来分析下:

flashcache把内部的cache空间分成很多set, 是以set而不是整体为单位提供cache以及flush后备操作. 也就是说当一个set里面的dirty page达到一个预设的值的时候,就需要把这么dirty page 淘汰并且flush到后备设备去,以便腾出空间给更热的数据使用。
那么每个set多大呢?

To compute the target set for a given dbn
target set = (dbn / block size / set size) mod (number of sets)
Once we have the target set, linear probe within the set finds the
block. Note that a sequential range of disk blocks will all map onto a
given set.

set默认是 512*4k = 2M大小,也就是说如果你的这个set刚好是一个文件所在的块,而且每次这个文件都不停的顺序写,很快这个set都变成dirty, 那么flashcache就选择马上刷,这样加速效果就没有了。

幸好作者Mohan认识到了这个问题,提供了解决方案:

见https://github.com/facebook/flashcache/blob/master/doc/flashcache-sa-guide.txt 中的章节Tuning Sequential IO Skipping for better flashcache performance

引入了配置参数来解决这个问题:

dev.flashcache..skip_seq_thresh_kb:
Skip (don’t cache) sequential IO larger than this number (in kb).
0 (default) means cache all IO, both sequential and random.
Sequential IO can only be determined ‘after the fact’, so
this much of each sequential I/O will be cached before we skip
the rest. Does not affect searching for IO in an existing cache.

这样你可以把太大的顺序操作给过滤掉了,大大提升性能。

祝玩得开心!

Post Footer automatically generated by wp-posturl plugin for wordpress.

详解服务器内存带宽计算和使用情况测量

September 12th, 2011 32 comments

原创文章,转载请注明: 转载自系统技术非业余研究

本文链接地址: 详解服务器内存带宽计算和使用情况测量

前段时间我们在MYSQL调优上发现有瓶颈,怀疑是过多拷贝内存,导致内存带宽用完。在Linux下CPU的使用情况有top工具, IO设备的使用情况有iostat工具,就是没有内存使用情况的测量工具。 我们可以看到大量的memcpy和字符串拷贝(可以用systemtap来测量),但是像简单的数据移动操作就无法统计,我们希望在硬件层面有办法可以查到CPU在过去的一段时间内总共对主存系统发起了多少读写字节数。

所以我们内存测量的的目标就归结为二点:1. 目前我们这样的服务器真正的内存带宽是多少。 2. 我们的应用到底占用了多少带宽。

首先来看下我们的服务器配置情况:

$ sudo ~/aspersa/summary 
# Aspersa System Summary Report ##############################
        Date | 2011-09-12 11:23:11 UTC (local TZ: CST +0800)
    Hostname | my031121.sqa.cm4
      Uptime | 13 days,  3:52,  2 users,  load average: 0.02, 0.01, 0.00
      System | Dell Inc.; PowerEdge R710; vNot Specified (<OUT OF SPEC>)
 Service Tag | DHY6S2X
     Release | Red Hat Enterprise Linux Server release 5.4 (Tikanga)
      Kernel | 2.6.18-164.el5
Architecture | CPU = 64-bit, OS = 64-bit
   Threading | NPTL 2.5
    Compiler | GNU CC version 4.1.2 20080704 (Red Hat 4.1.2-44).
     SELinux | Disabled
# Processor ##################################################
  Processors | physical = 2, cores = 12, virtual = 24, hyperthreading = yes
      Speeds | 24x2926.089
      Models | 24xIntel(R) Xeon(R) CPU X5670 @ 2.93GHz
      Caches | 24x12288 KB
# Memory #####################################################
       Total | 94.40G
        Free | 4.39G
        Used | physical = 90.01G, swap = 928.00k, virtual = 90.01G
     Buffers | 1.75G
      Caches | 7.85G
        Used | 78.74G
  Swappiness | vm.swappiness = 0
 DirtyPolicy | vm.dirty_ratio = 40, vm.dirty_background_ratio = 10
  Locator   Size     Speed             Form Factor   Type          Type Detail
  ========= ======== ================= ============= ============= ===========
  DIMM_A1   8192 MB  1333 MHz (0.8 ns) DIMM          {OUT OF SPEC} Synchronous
  DIMM_A2   8192 MB  1333 MHz (0.8 ns) DIMM          {OUT OF SPEC} Synchronous
  DIMM_A3   8192 MB  1333 MHz (0.8 ns) DIMM          {OUT OF SPEC} Synchronous
  DIMM_A4   8192 MB  1333 MHz (0.8 ns) DIMM          {OUT OF SPEC} Synchronous
  DIMM_A5   8192 MB  1333 MHz (0.8 ns) DIMM          {OUT OF SPEC} Synchronous
  DIMM_A6   8192 MB  1333 MHz (0.8 ns) DIMM          {OUT OF SPEC} Synchronous
  DIMM_B1   8192 MB  1333 MHz (0.8 ns) DIMM          {OUT OF SPEC} Synchronous
  DIMM_B2   8192 MB  1333 MHz (0.8 ns) DIMM          {OUT OF SPEC} Synchronous
  DIMM_B3   8192 MB  1333 MHz (0.8 ns) DIMM          {OUT OF SPEC} Synchronous
  DIMM_B4   8192 MB  1333 MHz (0.8 ns) DIMM          {OUT OF SPEC} Synchronous
  DIMM_B5   8192 MB  1333 MHz (0.8 ns) DIMM          {OUT OF SPEC} Synchronous
  DIMM_B6   8192 MB  1333 MHz (0.8 ns) DIMM          {OUT OF SPEC} Synchronous
  DIMM_A7   {EMPTY}  Unknown           DIMM          {OUT OF SPEC} Synchronous
  DIMM_A8   {EMPTY}  Unknown           DIMM          {OUT OF SPEC} Synchronous
  DIMM_A9   {EMPTY}  Unknown           DIMM          {OUT OF SPEC} Synchronous
  DIMM_B7   {EMPTY}  Unknown           DIMM          {OUT OF SPEC} Synchronous
  DIMM_B8   {EMPTY}  Unknown           DIMM          {OUT OF SPEC} Synchronous
  DIMM_B9   {EMPTY}  Unknown           DIMM          {OUT OF SPEC} Synchronous
...

DELL R710的机器上有2个X5670CPU,每个上面有6个core,超线程,所以共有24个逻辑CPU。上面插了12根 8192MB(1333 MHz)内存条。

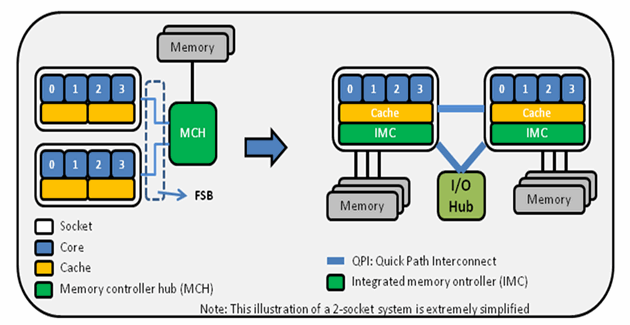
我们的机器架构从之前的FSB总线结构变成现在的numa架构,谢谢@fcicq提供的信息,请参考下图(来源):

我们可以清楚的看到每个CPU都有自己的内存控制器直接连接到内存去,而且有3个通道, CPU直接通过QPI连接。 内存控制器和QPI上面都会流动数据。
Read more…

Post Footer automatically generated by wp-posturl plugin for wordpress.

Fio模拟Mysql服务器IO压力脚本

September 7th, 2011 7 comments

原创文章,转载请注明: 转载自系统技术非业余研究

本文链接地址: Fio模拟Mysql服务器IO压力脚本

fio是个非常好用的io压力模拟工具,功能非常齐全, 有兴趣的同学参看 这里
这里我用fio模拟我们线上mysql服务器的压力来为厂家送来的pci-ssd卡做压力测试,底下是脚本(已经测试正确),也许有的同学有用。
Read more…

Post Footer automatically generated by wp-posturl plugin for wordpress.

Categories: Linux, 工具介绍 Tags: , ,

简易的python web服务器用途

July 22nd, 2011 6 comments

原创文章,转载请注明: 转载自系统技术非业余研究

本文链接地址: 简易的python web服务器用途

我们在工作中经常会需要看下报表,如tsung的统计报表或者lcov的覆盖情况,这些报表通常为了方便都会作成html格式的。我们可以把这些html网页打包拉回去用浏览器慢慢看,但是每次都要打包,拉数据非常麻烦。我们可以架设个web服务器来做这个事情。

apache或者nginx都太庞大,设置起来太麻烦。简易Python服务器来帮忙了。

只要在你的html的目录下运行:
Read more…

Post Footer automatically generated by wp-posturl plugin for wordpress.

Flashcache新版重大变化

July 21st, 2011 Comments off

原创文章,转载请注明: 转载自系统技术非业余研究

本文链接地址: Flashcache新版重大变化

facebook释出的flashcache见 https://github.com/facebook/flashcache, 也可以参考我之前写的 ppt 如何使用,或者参考我们的dba写的详细使用和配置,见 这里, 这里, 这里

7月20号,作者Mohan做了重大的改变,极大的提高了易用性。

1) Integration of all 3 caching modes (writeback, writethrough and
writearound) into the main flashcache module. Flashcache utilities
have been modified to add support for this as well.

2) Total Overhaul of the flashcache sysctls. Creates per-cache device
sysctl sets, so each individual cache device can be tuned differently.

之前的flashcache版本分成writeback和writethrough独立的版本,开发和维护倾向于writeback,导致很多特性writethrough跟不上,用起来就很不爽。现在好了。

随着磁盘越来越多,每个磁盘cache就非常的必要,因为每个cache的用途不同,需要做的策略也会很大不同。

这个版本更新非常重要。

祝玩得开心!

Post Footer automatically generated by wp-posturl plugin for wordpress.

Categories: Linux, 工具介绍 Tags:

sysbench oltp测试MySQL问题

July 1st, 2011 3 comments

原创文章,转载请注明: 转载自系统技术非业余研究

本文链接地址: sysbench oltp测试MySQL问题

昨天有同学在使用sysbench时候遇到了点小麻烦:

$ sysbench --test=oltp --oltp-table-size=100000000 --oltp-read-only=off --init-rng=on --num-threads=16 --max-requests=0 --oltp-dist-type=uniform --max-time=1800 --mysql-user=root   --db-driver=mysql --mysql-table-engine=innodb --oltp-test-mode=simple prepare
sysbench 0.4.12:  multi-threaded system evaluation benchmark

FATAL: unable to connect to MySQL server, aborting...
FATAL: error 1049: Unknown database 'sbtest'
FATAL: failed to connect to database server!
...

错误提示说:mysql连接不上, sbtest库没找到。

首先确认mysql是正常的…

$ mysql -u root
Welcome to the MySQL monitor.  Commands end with ; or \g.
Your MySQL connection id is 91
Server version: 5.1.48-debug-log Source distribution

Type 'help;' or '\h' for help. Type '\c' to clear the buffer.

mysql> use sbtest;
ERROR 1049 (42000): Unknown database 'sbtest'

但是库 sbtest确实不存在。

通过查看sysbench-0.4.12/sysbench/drivers/mysql/drv_mysql.c:400行

  DEBUG("mysql_real_connect(%p, \"%s\", \"%s\", \"%s\", \"%s\", %u, \"%s\", %s)",
        con,
        host,
        args.user,
        args.password,
        args.db,
        args.port,
        args.socket,
        (MYSQL_VERSION_ID >= 50000) ? "CLIENT_MULTI_STATEMENTS" : "0"
        );
  if (!mysql_real_connect(con,
                         host,
                         args.user,
                         args.password,
                         args.db,
                         args.port,
                         args.socket,
#if MYSQL_VERSION_ID >= 50000
                          CLIENT_MULTI_STATEMENTS)
#else
                          0)
#endif

我们可以看到sysbench在连接的时候需要先连接到sbtest库,但是库不存在,所以出现问题。

解决问题的方法很简单:
在mysql的shell下运行:

create database sbtest;

搞定。

小结:开源软件总是有点小问题,自己动手丰衣足食!

玩得开心!
Post Footer automatically generated by wp-posturl plugin for wordpress.

Categories: 工具介绍, 杂七杂八 Tags: ,