今天和项仲在部署新系统的时候发现节点间ping不成功的情况,类似
1> net_adm:ping(‘xx@ip1’).
pang
由于这个问题比较普遍,我就记录下一步步的排除步骤.
首先从原理上分析下!由于erlang节点间通讯是透过tcp来进行的,所以我们确保以下几点:
1. 确保网络连接是通的,可以透过ping来查看。
2. 确保网络连接上tcp是可以通的,可以透过netcat在二个节点所在的机器上分别开个服务器端和客户端进行验证。
3. 确保端口是防火墙友好的。erlang的节点是登记在epmd服务上的,所以4369端口要能访问,其次节点的动态端口是可以访问的。
epmd -names
epmd: up and running on port 4369 with data:
name xx at port 46627
…
同样可以用netcat来验证。
4. erlang节点的cookie是一样的,可以透过setcookie来解决。
这几点确认无误后,就可以开始排查问题了。
首先交代下环境,二台机器IP分别是10.1.150.12,10.232.31.89, 上面分别运行Erlang版本R16B和R14B04,cookie统一设置为456789。
接着我们来演习下,首先我们10.1.150.12在节点A上起个节点’xx@10.1.150.12’,如下:
Read more…
在过去我们了解系统IO的情况大多数是通过iostat来获取的,这个粒度只能精确到每个设备。通常我们会想了解每个进程,线程层面发起了多少IO,在Linux 2.6.20之前除了用systemtap这样的工具来实现是没有其他方法的,因为系统没有暴露这方面的统计。 disktop per设备per应用层面的IO读写统计,可以参考我之前写的,见这里.
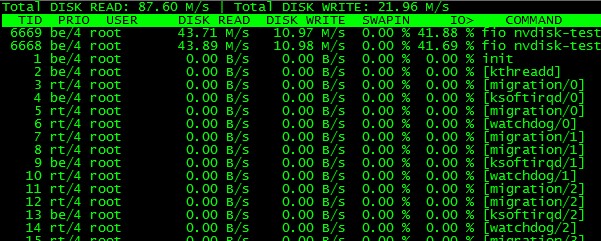
透过lxr的代码确认,在Linux 2.6.20以后引入了TASK_IO_ACCOUNTING功能,通过把每个线程和进程的io活动通过/proc/pid/io导出大大方便了用户,这里需要注意的是RHEL 5U4基于2.6.18内核但是他们backport了这个功能,并由此催生了相应的了解per进程Io活动的工具如pidstat和iotop, 这两个软件工作的时候截图如下:

pidstat可以看到带层次线程IO活动

iotop能看到扁平线程IO活动
通过strace来了解到这二个软件关于IO活动部分输入源都是/proc/pid/io, 让我们来了解下这个文件:
Read more…
最近在把玩些高速的SSD和nvram设备的时候,发现iostat无法统计到这些设备的信息,很是奇怪,于是分析和总结了一把,挺有意思的。
现象描述如下:
# uname -a
Linux dr4000 2.6.32-131.17.1.el6.x86_64 #1 SMP Wed Oct 5 17:19:54 CDT 2011 x86_64 x86_64 x86_64 GNU/Linux
# ls -al /dev/nvdisk0
brw-rw-r– 1 root root 252, 0 Mar 10 16:18 /dev/nvdisk0
# iostat -d
Linux 2.6.32-131.17.1.el6.x86_64 (dr4000) 03/10/2012 _x86_64_ (24 CPU)
Device: tps Blk_read/s Blk_wrtn/s Blk_read Blk_wrtn
sda 60.74 200.21 95.44 55171731 26299534
iostat很奇怪的看不到nvdisk0的IO统计信息.
开始我们的分析之旅,先简单的用strace看下iostat从那里读取这些统计信息的:
Read more…
Linux对大页面内存的引入对减少TLB的失效效果不错,特别是内存大而密集型的程序,比如说在数据库中的使用。innodb引擎就支持大页面内存,具体使用可参见 这里。
大页面更详细的资料可以参考: Documentation/vm/hugetlbpage.txt
过去使用大页面内存主要透过hugetlbfs需要mount文件系统到某个点去,部署起来很不方便,我们只想要点匿名页面,要搞的那么麻烦吗?
新的2.6.32内核通过支持MAP_HUGETLB方式来使用内存,避免了烦琐的mount操作,对用户更友好。
参见man mmap:
MAP_HUGETLB (since Linux 2.6.32)
Allocate the mapping using “huge pages.” See the kernel source file Documentation/vm/hugetlbpage.txt for further information.
这样明显会方便些,但是大内存页面预留的操作还是要做的,我们来演示下,先来准备环境:
Read more…
Fio 是个强大的IO压力测试工具,我之前写过不少fio的使用和实践,参见 这里。
随着块设备的发展,特别是SSD盘的出现,设备的并行度越来越高。利用好这些设备,有个诀窍就是提高设备的iodepth, 一把喂给设备更多的IO请求,让电梯算法和设备有机会来安排合并以及内部并行处理,提高总体效率。
应用使用IO通常有二种方式:同步和异步。 同步的IO一次只能发出一个IO请求,等待内核完成才返回,这样对于单个线程iodepth总是小于1,但是可以透过多个线程并发执行来解决,通常我们会用16-32根线程同时工作把iodepth塞满。 异步的话就是用类似libaio这样的linux native aio一次提交一批,然后等待一批的完成,减少交互的次数,会更有效率。
io队列深度通常对不同的设备很敏感,那么如何用fio来探测出合理的值呢?
让我们先来看下和iodepth相关的参数:
iodepth=int
Number of I/O units to keep in flight against the file. Note that increasing iodepth beyond 1 will not affect synchronous ioengines
(except for small degress when verify_async is in use). Even async engines my impose OS restrictions causing the desired depth not to be
achieved. This may happen on Linux when using libaio and not setting direct=1, since buffered IO is not async on that OS. Keep an eye on
the IO depth distribution in the fio output to verify that the achieved depth is as expected. Default:
1.
iodepth_batch=int
Number of I/Os to submit at once. Default: iodepth.
iodepth_batch_complete=int
This defines how many pieces of IO to retrieve at once. It defaults to 1 which
means that we’ll ask for a minimum of 1 IO in the retrieval process from the kernel. The IO retrieval will go on until we hit the limit
set by iodepth_low. If this variable is set to 0, then fio will always check for completed events before queuing more IO. This helps
reduce IO latency, at the cost of more retrieval system calls.
iodepth_low=int
Low watermark indicating when to start filling the queue again. Default: iodepth.
direct=bool
If true, use non-buffered I/O (usually O_DIRECT). Default: false.
fsync=int
How many I/Os to perform before issuing an fsync(2) of dirty data. If 0, don’t sync. Default: 0.
这几个参数在libaio的引擎下的作用,文档写的挺明白,但容我再罗嗦下IO请求的流程:
libaio引擎会用这个iodepth值来调用io_setup准备个可以一次提交iodepth个IO的上下文,同时申请个io请求队列用于保持IO。 在压测进行的时候,系统会生成特定的IO请求,往io请求队列里面扔,当队列里面的IO个数达到iodepth_batch值的时候,就调用io_submit批次提交请求,然后开始调用io_getevents开始收割已经完成的IO。 每次收割多少呢?由于收割的时候,超时时间设置为0,所以有多少已完成就算多少,最多可以收割iodepth_batch_complete值个。随着收割,IO队列里面的IO数就少了,那么需要补充新的IO。 什么时候补充呢?当IO数目降到iodepth_low值的时候,就重新填充,保证OS可以看到至少iodepth_low数目的io在电梯口排队着。
注意:这些参数在文档里面描述的有点小问题,比如说默认值什么的是不太对的,所以我的建议是这些参数要去显示的写。
如何确认fio安装我们的配置在工作呢? fio提供了诊断办法 --debug=io ,我们来演示下:
Read more…
最近经常要测试新硬件,了解硬件的具体型号和参数就非常重要,过去经常透过lspci, dmidecode, dmesg, ethtool, lshal, megacli等命令和各种/proc信息来了解,需要对这些工具很熟悉, 貌似比较不方便和准确。
今天看到某同学用的hwconfig感觉信息很专业,推荐给大家。这里可以下载, 感谢微博@frostwatcher同学.
hwconfig透过收集上面提到的各种信息, 然后根据wiki或者厂家公布的设备识别码, 进一步加工,给用户一个直观的信息.
不废话,效果如下:
$ uname -r
2.6.18-164.el5
$ hwconfig  -h
usage:  hwconfig [-dhnv] [-t timeout] [-r file] [-x file] [-o file]
        -d  show debugging information
        -h  show usage
        -n  don't break output lines
        -o  write output to file (- for stdout)
        -r  write raw source to file (- for stdout)
        -t  abort after timeout seconds
        -v  show version
        -x  write xml to file (- for stdout)
##简约模式
$ sudo hwconfig
hwconfig: warning: could not run megarc; please yinst megarc
Summary:        Huawei Technologies Tecal RH2285, 2 x Xeon E5620 2.40GHz, 23.5GB / 24GB 1066MHz
System:         Huawei Technologies Tecal RH2285 (Huawei Technologies BC11BTSA)
Processors:     2 x Xeon E5620 2.40GHz 133MHz FSB (16 cores)
Memory:         23.5GB / 24GB 1066MHz == 6 x 4GB, 6 x empty
Disk:           sda (megaraid_sas0): 107GB (38%) JBOD == 1 x LSI-MegaRAID-SAS-RMB
Disk:           sdb (megaraid_sas0): 5.9TB (1%) JBOD == 1 x LSI-MegaRAID-SAS-RMB
Disk-Control:   megaraid_sas0: LSI Logic / Symbios Logic MegaRAID SAS 1078
Disk-Control:   ata_piix0: Intel 82801JI (ICH10 Family) 4 port SATA IDE Controller
Disk-Control:   ata_piix1: Intel 82801JI (ICH10 Family) 2 port SATA IDE Controller
Network:        host5 (bnx2-1): Broadcom NetXtreme II BCM5709 Gigabit Ethernet
Network:        host6 (bnx2-0): Broadcom NetXtreme II BCM5709 Gigabit Ethernet
Network:        eth0 (bnx2): 08:19:a6:24:3c:05, 1000Mb/s <full-duplex>
Network:        eth1 (bnx2): 08:19:a6:24:3c:05, 1000Mb/s <full-duplex>
OS:             RHEL Server 5.4 (Tikanga), Linux 2.6.18-164.el5 x86_64, 64-bit
BIOS:           AMI CTSAV035 12/07/2010
Hostname:       xxxxxx

##这个是非常详细的模式, 了解到各个设备的细节.
$ sudo hwconfig -x cfg.xml
$ less cfg.xml
<system code_version="1.16.7" hostname="dr4000" timestamp="1331966816" xml_version="1.0.1">
  <base_board manufacturer="Dell Inc." model="084YMW" serial="..CN137401C800C9." version="A05" />
  <bios date="10/21/2011" manufacturer="Dell Inc." pretty="Dell 1.9.0 10/21/2011" rev="1.9" version="1.9.0" />
  <chipsets summary="Intel 5500 IOH-24D B3 (Tylersburg), 82801JIR A0 (ICH10R)">
    <chipset handle="56" model="5500 IOH-24D" name="Tylersburg" pci="00:00.0" pci_handle="1" stepping="B3" type="Northbridge" vendor="Intel" />
    <chipset handle="57" model="82801JIR" name="ICH10R" pci="00:1f.0" pci_handle="19" stepping="A0" type="Southbridge" vendor="Intel" />
  </chipsets>
...
 <volume controller="scsi0" drive_write_cache="default" handle="75" name="sda" raid="RAID-0" read_ahead="adaptive" size="598879502336" spans="1" status="ok" stripe="65536">
      <drives>
        <drive>66</drive>
        <drive>67</drive>
      </drives>
      <read_cache enable="0" />
      <write_cache enable="0" policy="write-back" />
    </volume>
  </storage>
  <system manufacturer="Dell Inc." model="Dell DR4000" pretty="Dell DR4000" serial="8MCBB3X" uuid="4C4C4544-004D-4310-8042-B8C04F423358" version="" />
</system>
看着信息还是很专业的,结果微博上有同学反映是个脚本,我看了下原来hwconfig真的是个脚本:
#!/usr/bin/perl -w

# $Id$

$ENV{PATH} = "/etc/bin:/sbin:/usr/sbin:/bin:/usr/bin:/usr/local/bin:/usr/local/sbin:/home/opt:/opt/MegaRAID/MegaCli:/usr/StorMan";

use strict 'vars';
use Getopt::Std;
use POSIX;
...
$ cat `which hwconfig `|wc -l
9101
挺佩服这帮人的,脚本也能有这样的耐心,写这么长。
祝大家玩得开心!
我们透过blktrace来观察io行为的时候,第一件事情需要选择目标设备,以便分析该设备的io行为。具体使用可以参考我之前写的几篇:这里 这里 这里
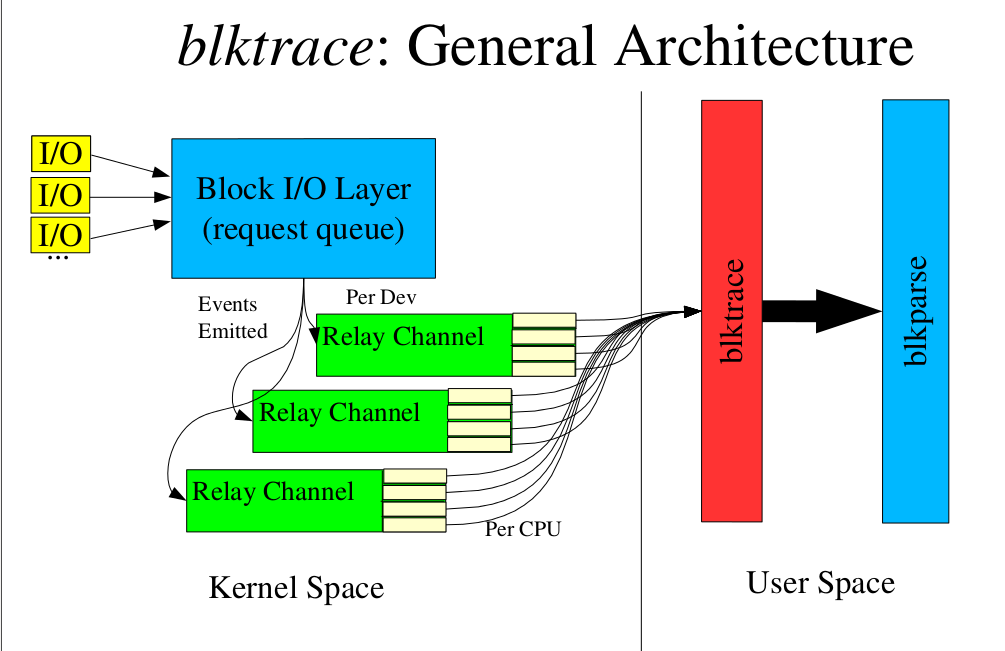
blktrace分为内核部分和应用部分,应用部分收到我们要捕捉的设备名单,传给内核。内核分布在block层的各个tracepoint就会开始工作,把相关的数据透过relayfs传递到blktrace的应用部分,应用部分把这些数据记到磁盘,以便后续分析。架构参见下图:
从man blktrace中可以看到:
blktrace stores the extracted data into files stored in the local directory. The format of the file names is (by default) device.blktrace.cpu, where device is the base device name (e.g, if we are tracing /dev/sda, the base device name would be sda); and cpu identifies a CPU for the event stream
这时候问题就来了,如果我的机器只有一个设备,那么blktrace存数据文件这个动作就会影响到我们正常的IO行为。
Read more…


Recent Comments