qperf测量网络带宽和延迟
原创文章,转载请注明: 转载自系统技术非业余研究
本文链接地址: qperf测量网络带宽和延迟
我们在做网络服务器的时候,通常会很关心网络的带宽和延迟。因为我们的很多协议都是request-reponse协议,延迟决定了最大的QPS,而带宽决定了最大的负荷。 通常我们知道自己的网卡是什么型号,交换机什么型号,主机之间的物理距离是多少,理论上是知道带宽和延迟是多少的。但是现实的情况是,真正的带宽和延迟情况会有很多变数的,比如说网卡驱动,交换机跳数,丢包率,协议栈配置,光实际速度都很大的影响了数值的估算。 所以我们需要找到工具来实际测量下。
网络测量的工具有很多,netperf什么的都很不错。 我这里推荐了qperf,这是RHEL 6发行版里面自带的,所以使用起来很方便,只要简单的:
yum install qperf
就好。
我们看下man qperf的介绍:
qperf measures bandwidth and latency between two nodes. It can work over TCP/IP as well as the RDMA transports. On one of the nodes, qperf is typically run with no arguments designating it the server node. One may then run qperf on a client node to obtain measurements such as bandwidth, latency and cpu utilization.
In its most basic form, qperf is run on one node in server mode by invoking it with no arguments. On the other node, it is run with two arguments: the name of the server node followed by the name of the test. A list of tests can be found in the section, TESTS. A variety of options may also be specified.
使用起来也相当简单:
在其中一台机器上运行qperf,不带任何参数就好,这台机器就充当服务器角色:
$ uname -r
2.6.32-131.21.1.tb477.el6.x86_64
$ qperf
在另外一台机器上运行qperf,测量tcp的带宽和延时,顺便看下双方机器的配置情况:
$ qperf 10.232.64.yyy tcp_bw tcp_lat conf
tcp_bw:
    bw  =  118 MB/sec
tcp_lat:
    latency  =  31.9 us
conf:
    loc_node   =  xxx.sqa.cm4
    loc_cpu    =  16 Cores: Intel Xeon  L5630 @ 2.13GHz
    loc_os     =  Linux 2.6.32-131.21.1.tb477.el6.x86_64
    loc_qperf  =  0.4.6
    rem_node   =  yyy.sqa.cm4
    rem_cpu    =  16 Cores: Intel Xeon  L5630 @ 2.13GHz
    rem_os     =  Linux 2.6.32-131.21.1.tb477.el6.x86_64
    rem_qperf  =  0.4.6
是不是很方便?典型情况下我们的带宽是118M,延迟是32us, 在标准的千M环境下是符合预期的。
当然qperf有很多高级参数,可以设置socket buffer的大小,绑定CPU亲缘性等, 很赞的一个特性是可以通过持续改变某个重要参数的值,来观察临界点:
-oo, –loop Var:Init:Last:Incr
Run a test multiple times sequencing through a series of values. Var is the loop variable;
Init is the initial value; Last is the value it must not exceed and Incr is the increment. It
is useful to set the –verbose_used (-vu) option in conjunction with this option.
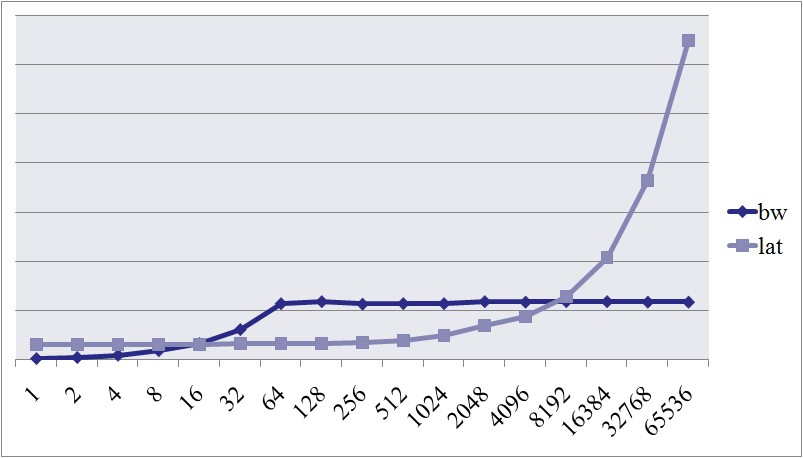
比如我们可以透过改变消息的大小(msg_size),比如从1个字节到64K,每次倍增的方式,来观察带宽和延迟的变化情况,演示下:
$ qperf -oo msg_size:1:64K:*2  10.232.64.yyy tcp_bw tcp_lat
tcp_bw:
    bw  =  2.43 MB/sec
tcp_bw:
    bw  =  4.69 MB/sec
tcp_bw:
    bw  =  9.12 MB/sec
tcp_bw:
    bw  =  18.5 MB/sec
tcp_bw:
    bw  =  33.1 MB/sec
tcp_bw:
    bw  =  61.4 MB/sec
tcp_bw:
    bw  =  114 MB/sec
tcp_bw:
    bw  =  118 MB/sec
tcp_bw:
    bw  =  113 MB/sec
tcp_bw:
    bw  =  114 MB/sec
tcp_bw:
    bw  =  114 MB/sec
tcp_bw:
    bw  =  118 MB/sec
tcp_bw:
    bw  =  117 MB/sec
tcp_bw:
    bw  =  118 MB/sec
tcp_bw:
    bw  =  118 MB/sec
tcp_bw:
    bw  =  117 MB/sec
tcp_bw:
    bw  =  117 MB/sec
tcp_lat:
    latency  =  31 us
tcp_lat:
    latency  =  31.1 us
tcp_lat:
    latency  =  31.1 us
tcp_lat:
    latency  =  31.4 us
tcp_lat:
    latency  =  30.8 us
tcp_lat:
    latency  =  32.1 us
tcp_lat:
    latency  =  32.6 us
tcp_lat:
    latency  =  33.3 us
tcp_lat:
    latency  =  35.5 us
tcp_lat:
    latency  =  38.6 us
tcp_lat:
    latency  =  50.1 us
tcp_lat:
    latency  =  69.6 us
tcp_lat:
    latency  =  88 us
tcp_lat:
    latency  =  128 us
tcp_lat:
    latency  =  209 us
tcp_lat:
    latency  =  365 us
tcp_lat:
    latency  =  650 us

我们可以看到当包的大小达到64字节的时候,带宽就上不去了;包到达1K的时候,延迟有了很大的变化。 这些临界点对我们的服务器编程时候对性能的估计和预期非常有帮助。
qperf除了测量tcp的,还可以测试rdma, udp, sctp等主流网络协议的带宽和延迟,算是个很新的工具,推荐大家使用。
祝玩得开心!
Post Footer automatically generated by wp-posturl plugin for wordpress.
自己按着测试了一把,工具很实用,转了~
dbafree Reply:
June 10th, 2012 at 8:39 pm
实际编程时,实际因机房和网络环境的影响会比较大,针对于排查问题和测试比较有用。
Yu Feng Reply:
June 10th, 2012 at 9:24 pm
是的,不实测不放心。
centos5.4,内部千兆网络,传输64字节,延时达到200us,这个正常吗?请问该如何优化?
Yu Feng Reply:
June 12th, 2012 at 1:25 pm
延迟太大,不正常
对于千兆LAN来说,传输的字节数和延迟时间应该在什么范围内才算合理呢?不知能不能推荐一些资料,还是说这样的判断只能依靠经验。
谢谢。
Yu Feng Reply:
June 15th, 2012 at 5:50 pm
比如说我贴出来的数据就是一个比较典型的值。最简单的方法你就是用主流的机器,用个主流的交换机,用过主流的操作系统如RHEL来测试下。
我们可以看到当包的大小达到64字节的时候,带宽就上不去了
不是64字节吧?
Yu Feng Reply:
June 27th, 2012 at 11:32 pm
那应该是多少呢
@richardc
怎么解释包里面的数据是64字节及以上带宽就不变了呢?
我的理解是数据长度到达64字节之后, tcp 发送buffer始终是满的,IP每次发送的报文里面数据长度始终是MTU(ethernet 是1500),这样每个ethernet packet 得到最大限度的使用,所以带宽达到最大值。
对包的数据长度超过1k,延迟变大,我理解是因为在测试机器的配置下,超过1k长度,内核的tcp接收buffer达到上限,必须要延迟发送方的发送速度,所以latency会不断增长。
以上不知道理解与否?
Yu Feng Reply:
July 18th, 2012 at 9:41 am
包是以mtu为单位的。
Jesse Reply:
July 18th, 2012 at 1:29 pm
@Jesse
谢谢,如果包都是MTU的长度,应该bw一直都不变才对?
wup Reply:
October 10th, 2012 at 3:43 pm
超过1k msg size在这个测试中就成了2K,超过了第二层MTUsize,应该在三层要分包传,延迟肯定增加较为明显。
buck Reply:
November 20th, 2012 at 5:01 pm
为什么包大小64字节以前,带宽吃不满呢?以太网MTU是1500字节,ip头8字节,tcp头20字节,远不到1500的限制啊?
Yu Feng Reply:
November 20th, 2012 at 5:03 pm
每个包发出去的时候都要穿越协议栈,这个时间很长, 以至于每秒可以发的包数目远小于了带宽/64.
我发现最多只能测试到118MB/s,如果bonding mod4 ,双Active,理论上能达到200MB/s,但是却测不到。
Yu Feng Reply:
June 6th, 2013 at 9:17 pm
网卡的中断要设置下。
junhua.yang Reply:
May 2nd, 2014 at 4:05 pm
能给些建议吗?