Archive

Archive for the ‘工具介绍’ Category

网络栈内存不足引发进程挂起问题

February 26th, 2013 13 comments

原创文章,转载请注明: 转载自系统技术非业余研究

本文链接地址: 网络栈内存不足引发进程挂起问题

我们知道TCP socket有发送缓冲区和接收缓冲区,这二个缓冲区都可以透过setsockopt设置SO_SNDBUF,SO_RCVBUF来修改,但是这些值设多大呢?这些值和协议栈的内存控制相关的值什么关系呢?
我们来解释下:

$ sysctl net|grep mem
net.core.wmem_max = 131071
net.core.rmem_max = 131071
net.core.wmem_default = 124928
net.core.rmem_default = 124928
net.core.optmem_max = 20480
net.ipv4.igmp_max_memberships = 20
net.ipv4.tcp_mem = 4631520 6175360 9263040
net.ipv4.tcp_wmem = 4096 16384 4194304
net.ipv4.tcp_rmem = 4096 87380 4194304
net.ipv4.udp_mem = 4631520 6175360 9263040
net.ipv4.udp_rmem_min = 4096
net.ipv4.udp_wmem_min = 4096

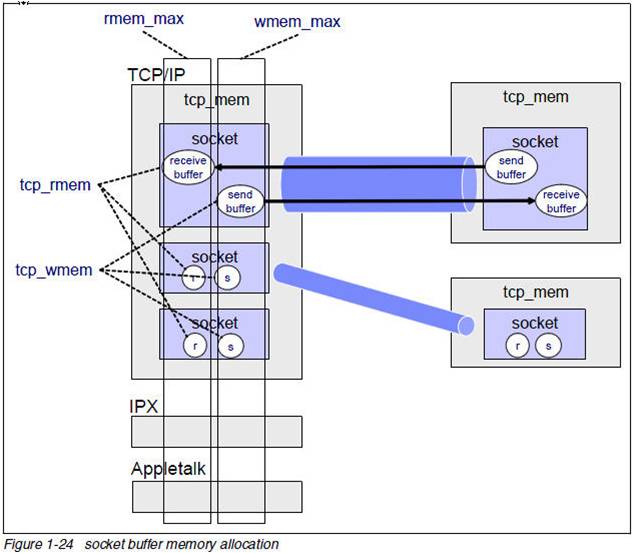
下面的图很好的解释了上面的问题:

socket_mem

这里要记住的是:TCP协议栈内存是不可交换物理内存,用一字节少一字节。
也正是由于这一点,操作系统出厂的时候上面的默认的内存设置都不算太大。对于一个不是网络密集型的服务器问题不大,但是对于如承担C1M链接的服务器来讲,问题就来了。我们在实践中会发现tcp服务经常超时,有时候超过100ms. 那么这个问题如何定位呢?
Read more…

Post Footer automatically generated by wp-posturl plugin for wordpress.

dropwatch 网络协议栈丢包检查利器

February 25th, 2013 13 comments

原创文章,转载请注明: 转载自系统技术非业余研究

本文链接地址: dropwatch 网络协议栈丢包检查利器

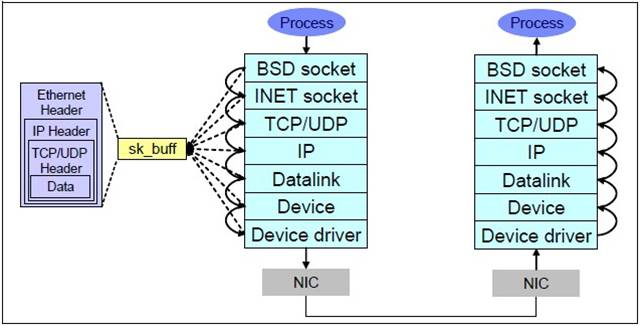
在做网络服务器的时候,会碰到各种各样的网络问题比如说网络超时,通常一般的开发人员对于这种问题最常用的工具当然是tcpdump或者更先进的wireshark来进行抓包分析。通常这个工具能解决大部分的问题,但是比如说wireshark发现丢包,那深层次的原因就很难解释了。这不怪开发人员,要怪就怪linux网络协议栈太深。我们来看下:
network-stack

这7层里面每个层都可能由于各种各样的原因,比如说缓冲区满,包非法等,把包丢掉,这样的问题就需要特殊的工具来发现了。 好了,主角dropwatch出场.
它的官方网站在这里

What is Dropwatch

Dropwatch is a project I am tinkering with to improve the visibility developers and sysadmins have into the Linux networking stack. Specifically I am aiming to improve our ability to detect and understand packets that get dropped within the stack.

Dropwatch定位很清晰,就是用来查看协议栈丢包的问题。

RHEL系的系统安装相当简单,yum安装下就好:

$ uname -r
2.6.32-131.21.1.tb477.el6.x86_64
$ sudo yum install dropwatch

man dropwatch下就可以得到使用的帮助,dropwatch支持交互模式, 方便随时启动和停止观测。

使用也是很简单:

$ sudo dropwatch -l kas
Initalizing kallsymsa db
dropwatch> start
Enabling monitoring...
Kernel monitoring activated.
Issue Ctrl-C to stop monitoring
1 drops at netlink_unicast+251
15 drops at unix_stream_recvmsg+32a
3 drops at unix_stream_connect+1dc

-l kas的意思是获取drop点的符号信息,这样的话针对源码就可以分析出来丢包的地方。

同学们可以参考这篇文章(Using netstat and dropwatch to observe packet loss on Linux servers):http://prefetch.net/blog/index.php/2011/07/11/using-netstat-and-dropwatch-to-observe-packet-loss-on-linux-servers/

那他的原理是什么呢?在解释原理之前,我们先看下这个工具的对等的stap脚本:
Read more…

Post Footer automatically generated by wp-posturl plugin for wordpress.

Categories: Linux, 工具介绍 Tags: ,

Likwid-高性能服务器开发不可缺少的工具箱

January 16th, 2013 8 comments

原创文章,转载请注明: 转载自系统技术非业余研究

本文链接地址: Likwid-高性能服务器开发不可缺少的工具箱

做高性能服务器的时候,知道如何开发高性能代码是一个事情,开发出来的系统是不是高性能那就是另外一个事情了。

通常我们需要了解系统的CPU拓扑结构,内存使用情况,各种CPU性能计数器的数字,各种CPU Cache的使用情况,命中率等等信息,这些信息有效的结合在一起才能准确的分析出我们程序的缺陷,从而找到更好的优化点。 通常这些信息是散落在系统的各个地方,对于普通的开发人员很难汇总起来,形成合力。

好了,以精细出名的德国人又来帮忙了,隆重推出Likwid。

Likwid

Likwid项目的地址在这里。 根据主页的上的描述:

Likwid stands for Like I knew what I am doing. This project contributes easy to use command line tools for Linux to support programmers in developing high performance multi threaded programs.

It contains the following tools:

likwid-topology: Show the thread and cache topology
likwid-perfctr: Measure hardware performance counters on Intel and AMD processors
likwid-features: Show and Toggle hardware prefetch control bits on Intel Core 2 processors
likwid-pin: Pin your threaded application without touching your code (supports pthreads, Intel OpenMP and gcc OpenMP)
likwid-bench: Benchmarking framework allowing rapid prototyping of threaded assembly kernels
likwid-mpirun: Script enabling simple and flexible pinning of MPI and MPI/threaded hybrid applications
likwid-perfscope: Frontend for likwid-perfctr timeline mode. Allows live plotting of performance metrics.
likwid-powermeter: Tool for accessing RAPL counters and query Turbo mode steps on Intel processor.
likwid-memsweeper: Tool to cleanup ccNUMA memory domains.
Likwid stands out because:

No kernel patching, any vanilla linux 2.6 or newer kernel works
Transparent, always clear which events are chosen, event tags have the same naming as in documentation
Lightweight, LIKWID tries to add no overhead and keeps out of your way.
Easy to use, simple to build, no need to touch your code, configurable from outside. Clear CLI interface.
Multiplatform, likwid supports Intel and AMD processors
Up to date, likwid tries to fully support new processors as soon as possible
Extensible, you can add functionality by means of simple text files

同时他的文档还是做的非常不错的,使用的介绍在这里

具体的使用我就不墨迹了,文档里面都有。我在这里秀下他的功能:
Read more…

Post Footer automatically generated by wp-posturl plugin for wordpress.

Categories: Linux, 工具介绍 Tags: , ,

qperf测量网络带宽和延迟

June 10th, 2012 18 comments

原创文章,转载请注明: 转载自系统技术非业余研究

本文链接地址: qperf测量网络带宽和延迟

我们在做网络服务器的时候,通常会很关心网络的带宽和延迟。因为我们的很多协议都是request-reponse协议,延迟决定了最大的QPS,而带宽决定了最大的负荷。 通常我们知道自己的网卡是什么型号,交换机什么型号,主机之间的物理距离是多少,理论上是知道带宽和延迟是多少的。但是现实的情况是,真正的带宽和延迟情况会有很多变数的,比如说网卡驱动,交换机跳数,丢包率,协议栈配置,光实际速度都很大的影响了数值的估算。 所以我们需要找到工具来实际测量下。

网络测量的工具有很多,netperf什么的都很不错。 我这里推荐了qperf,这是RHEL 6发行版里面自带的,所以使用起来很方便,只要简单的:

yum install qperf

就好。

我们看下man qperf的介绍:

qperf measures bandwidth and latency between two nodes. It can work over TCP/IP as well as the RDMA transports. On one of the nodes, qperf is typically run with no arguments designating it the server node. One may then run qperf on a client node to obtain measurements such as bandwidth, latency and cpu utilization.
In its most basic form, qperf is run on one node in server mode by invoking it with no arguments. On the other node, it is run with two arguments: the name of the server node followed by the name of the test. A list of tests can be found in the section, TESTS. A variety of options may also be specified.

使用起来也相当简单: Read more…

Post Footer automatically generated by wp-posturl plugin for wordpress.

Categories: Linux, 工具介绍 Tags: , , ,

Linux TASK_IO_ACCOUNTING功能以及如何使用

March 11th, 2012 4 comments

原创文章,转载请注明: 转载自系统技术非业余研究

本文链接地址: Linux TASK_IO_ACCOUNTING功能以及如何使用

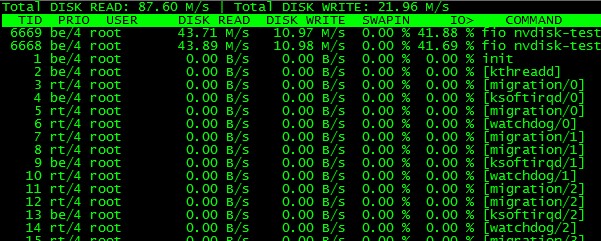
在过去我们了解系统IO的情况大多数是通过iostat来获取的,这个粒度只能精确到每个设备。通常我们会想了解每个进程,线程层面发起了多少IO,在Linux 2.6.20之前除了用systemtap这样的工具来实现是没有其他方法的,因为系统没有暴露这方面的统计。 disktop per设备per应用层面的IO读写统计,可以参考我之前写的,见这里.

透过lxr的代码确认,在Linux 2.6.20以后引入了TASK_IO_ACCOUNTING功能,通过把每个线程和进程的io活动通过/proc/pid/io导出大大方便了用户,这里需要注意的是RHEL 5U4基于2.6.18内核但是他们backport了这个功能,并由此催生了相应的了解per进程Io活动的工具如pidstat和iotop, 这两个软件工作的时候截图如下:

pidstat可以看到带层次线程IO活动


iotop能看到扁平线程IO活动

通过strace来了解到这二个软件关于IO活动部分输入源都是/proc/pid/io, 让我们来了解下这个文件:
Read more…

Post Footer automatically generated by wp-posturl plugin for wordpress.

Iostat看不到设备统计信息的原因分析

March 10th, 2012 2 comments

原创文章,转载请注明: 转载自系统技术非业余研究

本文链接地址: Iostat看不到设备统计信息的原因分析

最近在把玩些高速的SSD和nvram设备的时候,发现iostat无法统计到这些设备的信息,很是奇怪,于是分析和总结了一把,挺有意思的。

现象描述如下:

# uname -a
Linux dr4000 2.6.32-131.17.1.el6.x86_64 #1 SMP Wed Oct 5 17:19:54 CDT 2011 x86_64 x86_64 x86_64 GNU/Linux
# ls -al /dev/nvdisk0
brw-rw-r– 1 root root 252, 0 Mar 10 16:18 /dev/nvdisk0
# iostat -d
Linux 2.6.32-131.17.1.el6.x86_64 (dr4000) 03/10/2012 _x86_64_ (24 CPU)

Device: tps Blk_read/s Blk_wrtn/s Blk_read Blk_wrtn
sda 60.74 200.21 95.44 55171731 26299534

iostat很奇怪的看不到nvdisk0的IO统计信息.

开始我们的分析之旅,先简单的用strace看下iostat从那里读取这些统计信息的:
Read more…

Post Footer automatically generated by wp-posturl plugin for wordpress.

Categories: 工具介绍, 调优 Tags: ,

Fio压测工具和io队列深度理解和误区

March 9th, 2012 43 comments

原创文章,转载请注明: 转载自系统技术非业余研究

本文链接地址: Fio压测工具和io队列深度理解和误区

Fio 是个强大的IO压力测试工具,我之前写过不少fio的使用和实践,参见 这里

随着块设备的发展,特别是SSD盘的出现,设备的并行度越来越高。利用好这些设备,有个诀窍就是提高设备的iodepth, 一把喂给设备更多的IO请求,让电梯算法和设备有机会来安排合并以及内部并行处理,提高总体效率。

应用使用IO通常有二种方式:同步和异步。 同步的IO一次只能发出一个IO请求,等待内核完成才返回,这样对于单个线程iodepth总是小于1,但是可以透过多个线程并发执行来解决,通常我们会用16-32根线程同时工作把iodepth塞满。 异步的话就是用类似libaio这样的linux native aio一次提交一批,然后等待一批的完成,减少交互的次数,会更有效率。

io队列深度通常对不同的设备很敏感,那么如何用fio来探测出合理的值呢?

让我们先来看下和iodepth相关的参数:

iodepth=int
Number of I/O units to keep in flight against the file. Note that increasing iodepth beyond 1 will not affect synchronous ioengines
(except for small degress when verify_async is in use). Even async engines my impose OS restrictions causing the desired depth not to be
achieved. This may happen on Linux when using libaio and not setting direct=1, since buffered IO is not async on that OS. Keep an eye on
the IO depth distribution in the fio output to verify that the achieved depth is as expected. Default:
1.

iodepth_batch=int
Number of I/Os to submit at once. Default: iodepth.

iodepth_batch_complete=int
This defines how many pieces of IO to retrieve at once. It defaults to 1 which
means that we’ll ask for a minimum of 1 IO in the retrieval process from the kernel. The IO retrieval will go on until we hit the limit
set by iodepth_low. If this variable is set to 0, then fio will always check for completed events before queuing more IO. This helps
reduce IO latency, at the cost of more retrieval system calls.

iodepth_low=int
Low watermark indicating when to start filling the queue again. Default: iodepth.

direct=bool
If true, use non-buffered I/O (usually O_DIRECT). Default: false.

fsync=int
How many I/Os to perform before issuing an fsync(2) of dirty data. If 0, don’t sync. Default: 0.

这几个参数在libaio的引擎下的作用,文档写的挺明白,但容我再罗嗦下IO请求的流程:

libaio引擎会用这个iodepth值来调用io_setup准备个可以一次提交iodepth个IO的上下文,同时申请个io请求队列用于保持IO。 在压测进行的时候,系统会生成特定的IO请求,往io请求队列里面扔,当队列里面的IO个数达到iodepth_batch值的时候,就调用io_submit批次提交请求,然后开始调用io_getevents开始收割已经完成的IO。 每次收割多少呢?由于收割的时候,超时时间设置为0,所以有多少已完成就算多少,最多可以收割iodepth_batch_complete值个。随着收割,IO队列里面的IO数就少了,那么需要补充新的IO。 什么时候补充呢?当IO数目降到iodepth_low值的时候,就重新填充,保证OS可以看到至少iodepth_low数目的io在电梯口排队着。

注意:这些参数在文档里面描述的有点小问题,比如说默认值什么的是不太对的,所以我的建议是这些参数要去显示的写。

如何确认fio安装我们的配置在工作呢? fio提供了诊断办法 --debug=io ,我们来演示下:

Read more…
Post Footer automatically generated by wp-posturl plugin for wordpress.

Categories: 工具介绍 Tags: , ,