Archive

Archive for the ‘Linux’ Category

Linux常用性能调优工具索引

February 27th, 2013 9 comments

原创文章,转载请注明: 转载自系统技术非业余研究

本文链接地址: Linux常用性能调优工具索引

前段时间看到brendangregg的 Linux Performance Analysis and Tools PPT里面提到Linux常用性能调优工具, 见下图:

linux_tool

其中提到了的工具,大部分在我日常工具箱里或者在实践的案例里面使用过, 都有很高的价值,这里方便大家索引下:

更多的Linux系统工具介绍请参见 这里

祝玩得开心!

Post Footer automatically generated by wp-posturl plugin for wordpress.

Categories: Linux, 工具介绍 Tags: ,

nicstat 网络流量统计利器

February 27th, 2013 6 comments

原创文章,转载请注明: 转载自系统技术非业余研究

本文链接地址: nicstat 网络流量统计利器

前段时间看到brendangregg的 Linux Performance Analysis and Tools PPT里面提到的nicstat,研究了下是个不错的东西,分享给大家。

nicstat is to network interfaces as “iostat” is to disks, or “prstat” is to processes.

nicstat原本是Solaris平台下显示网卡流量的工具,Tim Cook将它移植到linux平台,官方网站见 这里。 相比netstat, 他有以下关键特性:

  • Reports bytes in & out as well as packets.
  • Normalizes these values to per-second rates.
  • Reports on all interfaces (while iterating)
  • Reports Utilization (rough calculation as of now)
  • Reports Saturation (also rough)
  • Prefixes statistics with the current time

我们来体验下,首先安装之,源码在 这里 下, 目前最新的版本是1.92。
解开后,由于这个版本默认是在32位linux下编译,所以需要改下Makefile.Linux:

$ uname -r
2.6.32-131.21.1.tb477.el6.x86_64
$ diff Makefile.Linux64 Makefile.Linux
17c17
< CFLAGS =      $(COPT) -m32
---
> CFLAGS =      $(COPT)

$ sudo make -f Makefile.Linux install  
sudo install -o root -g root -m 4511 `./nicstat.sh --bin-name` /usr/local/bin/nicstat
sudo install -o bin -g bin -m 555 enicstat /usr/local/bin
sudo install -o bin -g bin -m 444 nicstat.1 /usr/local/share/man/man1/nicstat.1

enicstat就安装好可以使用了。

使用文档在这里: man nicstat
由于在linux下需要获取网卡的speed等信息,需要以特权用户运行。
Read more…

Post Footer automatically generated by wp-posturl plugin for wordpress.

网络栈内存不足引发进程挂起问题

February 26th, 2013 13 comments

原创文章,转载请注明: 转载自系统技术非业余研究

本文链接地址: 网络栈内存不足引发进程挂起问题

我们知道TCP socket有发送缓冲区和接收缓冲区,这二个缓冲区都可以透过setsockopt设置SO_SNDBUF,SO_RCVBUF来修改,但是这些值设多大呢?这些值和协议栈的内存控制相关的值什么关系呢?
我们来解释下:

$ sysctl net|grep mem
net.core.wmem_max = 131071
net.core.rmem_max = 131071
net.core.wmem_default = 124928
net.core.rmem_default = 124928
net.core.optmem_max = 20480
net.ipv4.igmp_max_memberships = 20
net.ipv4.tcp_mem = 4631520 6175360 9263040
net.ipv4.tcp_wmem = 4096 16384 4194304
net.ipv4.tcp_rmem = 4096 87380 4194304
net.ipv4.udp_mem = 4631520 6175360 9263040
net.ipv4.udp_rmem_min = 4096
net.ipv4.udp_wmem_min = 4096

下面的图很好的解释了上面的问题:

socket_mem

这里要记住的是:TCP协议栈内存是不可交换物理内存,用一字节少一字节。
也正是由于这一点,操作系统出厂的时候上面的默认的内存设置都不算太大。对于一个不是网络密集型的服务器问题不大,但是对于如承担C1M链接的服务器来讲,问题就来了。我们在实践中会发现tcp服务经常超时,有时候超过100ms. 那么这个问题如何定位呢?
Read more…

Post Footer automatically generated by wp-posturl plugin for wordpress.

dropwatch 网络协议栈丢包检查利器

February 25th, 2013 13 comments

原创文章,转载请注明: 转载自系统技术非业余研究

本文链接地址: dropwatch 网络协议栈丢包检查利器

在做网络服务器的时候,会碰到各种各样的网络问题比如说网络超时,通常一般的开发人员对于这种问题最常用的工具当然是tcpdump或者更先进的wireshark来进行抓包分析。通常这个工具能解决大部分的问题,但是比如说wireshark发现丢包,那深层次的原因就很难解释了。这不怪开发人员,要怪就怪linux网络协议栈太深。我们来看下:
network-stack

这7层里面每个层都可能由于各种各样的原因,比如说缓冲区满,包非法等,把包丢掉,这样的问题就需要特殊的工具来发现了。 好了,主角dropwatch出场.
它的官方网站在这里

What is Dropwatch

Dropwatch is a project I am tinkering with to improve the visibility developers and sysadmins have into the Linux networking stack. Specifically I am aiming to improve our ability to detect and understand packets that get dropped within the stack.

Dropwatch定位很清晰,就是用来查看协议栈丢包的问题。

RHEL系的系统安装相当简单,yum安装下就好:

$ uname -r
2.6.32-131.21.1.tb477.el6.x86_64
$ sudo yum install dropwatch

man dropwatch下就可以得到使用的帮助,dropwatch支持交互模式, 方便随时启动和停止观测。

使用也是很简单:

$ sudo dropwatch -l kas
Initalizing kallsymsa db
dropwatch> start
Enabling monitoring...
Kernel monitoring activated.
Issue Ctrl-C to stop monitoring
1 drops at netlink_unicast+251
15 drops at unix_stream_recvmsg+32a
3 drops at unix_stream_connect+1dc

-l kas的意思是获取drop点的符号信息,这样的话针对源码就可以分析出来丢包的地方。

同学们可以参考这篇文章(Using netstat and dropwatch to observe packet loss on Linux servers):http://prefetch.net/blog/index.php/2011/07/11/using-netstat-and-dropwatch-to-observe-packet-loss-on-linux-servers/

那他的原理是什么呢?在解释原理之前,我们先看下这个工具的对等的stap脚本:
Read more…

Post Footer automatically generated by wp-posturl plugin for wordpress.

Categories: Linux, 工具介绍 Tags: ,

mmap的MAP_POPULATE标志妙用

January 19th, 2013 1 comment

原创文章,转载请注明: 转载自系统技术非业余研究

本文链接地址: mmap的MAP_POPULATE标志妙用

前段时间在学习MySQL和内核的时候,碰巧遇到twitter的dba老大在折腾numa不平衡问题的问题而写了二篇numa相关的文章,非常有技术含量。参见 这里

numa不平衡问题的解决方案摘抄如下:

A more thorough solution

The original post also only addressed only one part of the solution: using interleaved allocation.
A complete and reliable solution actually requires three things, as we found when implementing this change for production systems at Twitter:

1. Forcing interleaved allocation with numactl –interleave=all. This is exactly as described previously, and works well.

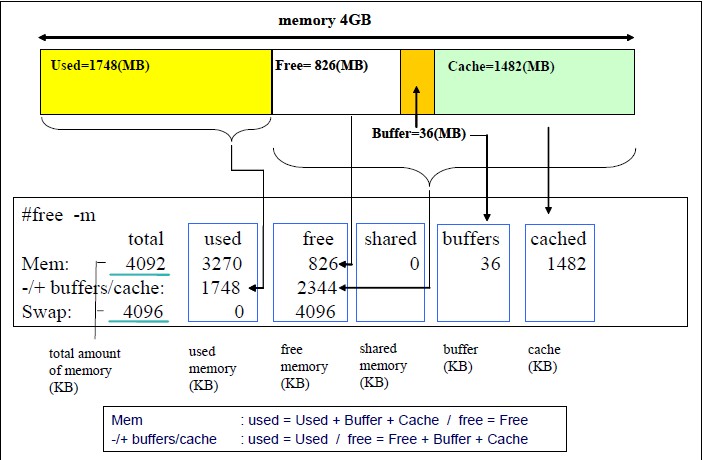
2. Flushing Linux’s buffer caches just before mysqld startup with sysctl -q -w vm.drop_caches=3. This helps to ensure allocation fairness, even if the daemon is
restarted while significant amounts of data are in the operating system buffer cache.

3. Forcing the OS to allocate InnoDB’s buffer pool immediately upon startup, using MAP_POPULATE where supported (Linux 2.6.23+), and falling back to memset otherwise. This forces the NUMA node allocation decisions to be made immediately, while the buffer cache is still clean from the above flush.

具体的代码实现参看 这里
其中就提到了如何用mmap的MAP_POPULATE来达到匿名页预先分配的问题,这是非常好的思路。

我们来man mmap看下:

MAP_POPULATE (since Linux 2.5.46)
Populate (prefault) page tables for a mapping. For a file mapping, this causes read-ahead on
the file. Later accesses to the mapping will not be blocked by page faults. MAP_POPULATE is
only supported for private mappings since Linux 2.6.23.

这个标志很早就有了,但是其实很少程序用到了这个特性,去年分析内核内存系统实现的时候,重点读过这块代码。这个特性在特殊的场景下还是挺有好处的。

我们知道通常我们mmap出来的内存,要不是匿名页面,要不就是文件的映射。当访问这块线性地址的时候,如果需要的页面不在内存中,就会发生缺页中断,内核分配物理内存,如果是文件后背的话,顺手把文件读进来。这样在高性能服务器里面分配内存的动作就会成为问题。

问题主要体现在2点:
1. 内存分配的时候,系统的内存已经比较乱了,不知道系统会从那个numa节点去分配,而且极端的时候,发生内存短缺,会换出内存页面,这个时间非常不可控。内存的分配也无法准确的指定。
2. 读文件这个时间非常不可控,系统可能会被挂起等待IO动作完成。

如果我们能够在系统内存还比较干净的时候,比如刚开机或者刚做完vm.drop_caches=3的时候,去把我们需要的内存或者数据预先按照我们设想的方式来准备,虽然这个集中化的动作会化很长的时间,但是换来的是后续的可控性。

mmap的MAP_POPULATE标志使用代码参见这里:
mmap

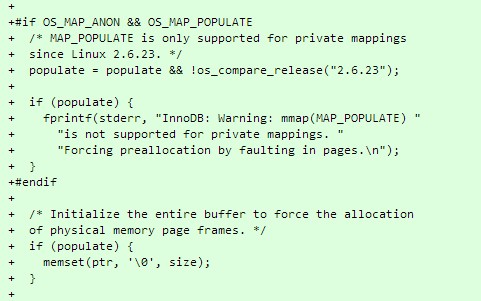
如果你的系统没有这个函数,使用memset(ptr, ‘\0’, size);也是个好的方案。

总结:高性能服务器细节多,技术含量高!

祝玩的开心!

Post Footer automatically generated by wp-posturl plugin for wordpress.

Linux Used内存到底哪里去了?

January 19th, 2013 44 comments

原创文章,转载请注明: 转载自系统技术非业余研究

本文链接地址: Linux Used内存到底哪里去了?

前几天 纯上 同学问了一个问题:

我ps aux看到的RSS内存只有不到30M,但是free看到内存却已经使用了7,8G了,已经开始swap了,请问ps aux的实际物理内存统计是不是漏了哪些内存没算?我有什么办法确定free中used的内存都去哪儿了呢?

这个问题不止一个同学遇到过了,之前子嘉同学也遇到这个问题,内存的计算总是一个迷糊账。 我们今天来把它算个清楚下!

通常我们是这样看内存的剩余情况的:

$free -m
             total       used       free     shared    buffers     cached
Mem:         48262       7913      40349          0         14        267
-/+ buffers/cache:       7631      40631
Swap:         2047        336       1711

那么这个信息是如何解读的呢,以下这个图解释的挺清楚的!
free

补充(不少人反映图不清晰,请参考:http://www.redbooks.ibm.com/redpapers/pdfs/redp4285.pdf P46-47)

上面的情况下我们总的内存有48262M,用掉了7913M。 其中buffer+cache总共14+267=281M, 由于这种类型的内存是可以回收的,虽然我们用掉了7913M,但是实际上我们如果实在需要的话,这部分buffer/cache内存是可以放出来的。

我们来演示下:

$ sudo sysctl vm.drop_caches=3
vm.drop_caches = 3
$ free -m
             total       used       free     shared    buffers     cached
Mem:         48262       7676      40586          0          3         41
-/+ buffers/cache:       7631      40631
Swap:         2047        336       1711

我们把buffer/cache大部分都清除干净了,只用了44M,所以我们这次used的空间是7676M。
到现在我们比较清楚几个概念:
1. 总的内存多少
2. buffer/cache内存可以释放的。
3. used的内存的概率。

即使是这样我们还是要继续追查下used的空间(7637M)到底用到哪里去了?
Read more…

Post Footer automatically generated by wp-posturl plugin for wordpress.

Categories: Linux, 源码分析 Tags: , , , ,

深度剖析告诉你irqbalance有用吗?

January 17th, 2013 8 comments

原创文章,转载请注明: 转载自系统技术非业余研究

本文链接地址: 深度剖析告诉你irqbalance有用吗?

irqbalance项目的主页在这里

irqbalance用于优化中断分配,它会自动收集系统数据以分析使用模式,并依据系统负载状况将工作状态置于 Performance mode 或 Power-save mode。处于Performance mode 时,irqbalance 会将中断尽可能均匀地分发给各个 CPU core,以充分利用 CPU 多核,提升性能。
处于Power-save mode 时,irqbalance 会将中断集中分配给第一个 CPU,以保证其它空闲 CPU 的睡眠时间,降低能耗。

在RHEL发行版里这个守护程序默认是开机启用的,那如何确认它的状态呢?

# service irqbalance status
irqbalance (pid PID) is running…

然后在实践中,我们的专用的应用程序通常是绑定在特定的CPU上的,所以其实不可不需要它。如果已经被打开了,我们可以用下面的命令关闭它:

# service irqbalance stop
Stopping irqbalance: [ OK ]

或者干脆取消开机启动:

# chkconfig irqbalance off

下面我们来分析下这个irqbalance的工作原理,好准确的知道什么时候该用它,什么时候不用它。

既然irqbalance用于优化中断分配,首先我们从中断讲起,文章很长,深吸一口气,来吧!

SMP IRQ Affinity 相关东西可以参见 这篇文章
摘抄重点:

SMP affinity is controlled by manipulating files in the /proc/irq/ directory.
In /proc/irq/ are directories that correspond to the IRQs present on your
system (not all IRQs may be available). In each of these directories is
the “smp_affinity” file, and this is where we will work our magic.

说白了就是往/proc/irq/N/smp_affinity文件写入你希望的亲缘的CPU的mask码! 关于如何手工设置中断亲缘性,请参见我之前的博文: 这里 这里

接着普及下概念,我们再来看下CPU的拓扑结构,首先看下Intel CPU的各个部件之间的关系:
cpu-term0
一个NUMA node包括一个或者多个Socket,以及与之相连的local memory。一个多核的Socket有多个Core。如果CPU支持HT,OS还会把这个Core看成 2个Logical Processor。
Read more…

Post Footer automatically generated by wp-posturl plugin for wordpress.